14 IKEA Kitchen Hacks for Creating a Custom-Looking Kitchen on a Budget
A custom-looking kitchen on a budget is a kitchen built from standard, affordable parts that has been finished with the trim, hardware, and details of bespoke cabinetry. This guide gives you 14 IKEA kitchen hacks for creating a custom-looking kitchen on a budget, each one using off-the-shelf pieces and basic tools.
Picture the smooth weight of a solid brass pull in your palm and the hush of a soft-close door settling into a flush frame. Imagine a ceiling-height cabinet run that looks carved into the wall, a toe-kick painted to match, and a faint scent of fresh paint on a Sunday morning. Custom is mostly a question of finishing, and finishing is something you can do yourself. Here are 14 ideas worth saving, and stealing.
Why IKEA Kitchen Hacks for Creating a Custom-Looking Kitchen on a Budget Work So Well
IKEA hacking started with people who noticed that the cabinet boxes were well built and cheap, while the fronts and trim were what made a kitchen look expensive. Swap the fronts, add trim, and a standard kitchen takes on the look of a custom one.
The core materials are easy to shop: melamine cabinet boxes, MDF or solid wood door fronts, quarter-round and crown molding, brass and matte black hardware, and butcher block or stone-look counters. The most reliable colors are warm white, deep green, natural oak, and soft greige, which suit both modern and traditional spaces.
The trend is driven by cost. A semi-custom kitchen can run $20,000 to $40,000, while an IKEA-based version with upgraded fronts and trim often costs $3,000 to $8,000. Social media has also made the hack visible, with before-and-after posts reaching millions of viewers.
Beginners can do much of this with a drill, a level, and patience. The honest limits are precision and time: trim has to be cut and caulked carefully, and a full run takes several weekends.
| Style at a Glance | |
| Philosophy | Standard boxes, bespoke details |
| Key Materials | Melamine boxes, MDF and oak fronts, crown molding, brass hardware |
| Key Colors | Warm white, deep green, natural oak, greige |
1. The Custom Door Fronts That Cost Half of Semi-Custom

Material note: A 10-door run of unfinished shaker fronts runs about $400 to $900. Prime and paint them with two coats of satin enamel. The beginner mistake is skipping the sanding between coats, which leaves a rough finish.
Color note: Deep forest green with aged brass looks rich and works with oak or white counters.
Budget swap: Paint your existing flat doors and add applied shaker trim for about $120.
💡 Quick Win: Spray the doors lying flat on sawhorses for the smoothest finish.
Shop The Look
- Unfinished shaker-style MDF cabinet doors
- Cabinet enamel paint in forest green, satin
- Bonding primer, quart
- Aged brass cabinet knobs, 20-pack
- Foam roller and tray set
2. Crown Molding That Makes Cabinets Reach the Ceiling

Material note: Use 3-inch paint-grade crown molding, about 20 linear feet (roughly $60 to $120), plus a 3-inch strip of lumber to build up the cabinet top. Cut with a miter box and caulk every seam. The beginner mistake is cutting the corners without a test piece, so cut scrap first.
Color note: Paint the molding the same color as the cabinets to look seamless.
Budget swap: Use flexible polyurethane molding that cuts with a utility knife, about $45.
Shop The Look
- 3-inch paint-grade crown molding, 8-foot lengths
- Miter saw and box set, manual
- Paintable white caulk
- Finish nail gun brads, 1.5-inch
- Painter’s tape, delicate surface
3. Fluted Panels That Turn an Island Into a Showpiece

Material note: Use two flexible oak slat panels (about $60 to $90 total), construction adhesive, and painter’s tape to hold them for 24 hours. Finish with a wipe-on oil. The beginner mistake is skipping primer on raw wood, which makes finishes blotchy.
Color note: Honey oak with white stone is warm without feeling heavy.
Budget swap: Use peel-and-stick fluted film for about $30.
💡 Quick Win: Test one panel on the back of the island first.
Shop The Look
- Flexible oak fluted wall panels
- Construction adhesive, heavy duty
- Wipe-on wood oil finish, clear
- Foam brush set
- Brushed brass cabinet pulls
4. A Built-In Look Fridge Surround for $120

Material note: Buy two 24 x 84-inch cabinet side panels and a 24-inch-wide wall cabinet (about $100 to $180 in all). Leave 1/2 inch of clearance on each side for airflow. The beginner mistake is boxing the fridge in without clearance, which makes it overheat.
Color note: Warm white panels around steel look clean and balanced.
Budget swap: Use plywood panels painted to match for about $60.
Shop The Look
- 24 x 84-inch cabinet end panels, white
- Fridge-top wall cabinet, 24-inch
- Paintable flexible caulk
- Cabinet leveling feet, adjustable
- Felt furniture pads for panels
5. Brass Hardware That Reads as Designer

Material note: Choose 8-inch center-to-center brass bar pulls in a 10-pack (about $30 to $50). Use a template jig for consistent holes. The beginner mistake is mismatching the center-to-center spacing, so measure before you buy.
Color note: Brushed brass on white or green fronts gives a warm, intentional glow.
Budget swap: Spray-paint the old handles with metal primer and brass paint for about $14.
💡 Quick Win: Place pulls at the same height on every drawer using a template jig.
Shop The Look
- 8-inch brushed brass drawer pulls, 10-pack
- Cabinet hardware installation jig
- Brad point drill bit set
- Metal primer spray
- Brass spray paint, satin
6. A Tall Pantry Run With Matching Panels

Material note: Use two 30 x 90-inch tall cabinet boxes with matching doors and 2 inches of oak trim along the top (about $350 to $600). Assembly takes a day. The beginner mistake is skipping wall anchors, so secure each unit to studs.
Color note: Warm white with oak trim keeps a tall wall light and soft.
Budget swap: Use one tall cabinet and fill the rest of the wall with open shelves.
Shop The Look
- 30 x 90-inch tall cabinet box
- Matching shaker door set, warm white
- Oak trim strip, 1 x 2 inch
- Cabinet wall anchor straps
- Soft-close door dampers
7. A Plinth and Toe-Kick Upgrade That Hides the Base

Material note: Cut 3/4-inch plywood strips to height (about 4 inches), prime, and paint to match the cabinets (about $25 to $45). Attach with construction adhesive and finish nails. The beginner mistake is forgetting to scribe to uneven floors, so measure at several points.
Color note: Matching color makes the cabinets look as if they float.
Budget swap: Use paintable vinyl baseboard for about $20.
💡 Quick Win: Use painter’s tape on the floor so paint never scuffs the finish.
Shop The Look
- 3/4-inch birch plywood strip, 4 x 96 inch
- Construction adhesive tube
- Brad nails, 1.25-inch
- Paintable caulk, flexible
- Floor-protecting painter’s tape
8. Butcher Block Counters With a Waterfall Edge

Material note: Use two oak slabs, 25 x 74 inches for the top and 25 x 36 inches for the side (about $280 to $400), joined with a mitered corner and wood glue. Allow 24 hours for glue to cure. The beginner mistake is cutting the miter without a guide, so use a clamped straightedge.
Color note: Honey oak with cream cabinets looks warm and welcoming.
Budget swap: Skip the waterfall and add a clean overhang for about $60 less.
Shop The Look
- Oak butcher block slabs, 25 x 74 and 25 x 36
- Wood glue, waterproof
- Bar clamps, 36-inch, set of 4
- Butcher block conditioner
- Circular saw guide rail
9. Glass-Front Uppers That Add Depth and Light

Material note: Replace two upper doors with glass-front versions (about $90 to $180 for a pair) and add battery puck lights inside. The beginner mistake is leaving shelves untidy, so edit what you display.
Color note: Matte black frames and white dishes look crisp and graphic.
Budget swap: Add reeded glass film to existing doors for about $20.
💡 Quick Win: Line the back of the cabinet with removable wallpaper for a custom backdrop.
Shop The Look
- Glass-front cabinet door, shaker style, black frame
- Battery-powered LED puck lights
- Removable peel-and-stick wallpaper
- White dinner plate set
- Shelf liner, clear grip
10. A Range Hood Wrap in Wood or Plaster

Material note: Build a 36-inch tapered frame from 1×2 lumber and cover with 1/4-inch plywood or shiplap (about $80 to $140). Keep 6 inches of clearance for heat. The beginner mistake is wrapping too close to the hood, which is a fire risk.
Color note: A white wrap with a thin brass trim band reads as refined.
Budget swap: Paint the existing steel hood with high-heat white enamel for about $18.
Shop The Look
- 1/4-inch plywood sheet, 4 x 8 ft
- 1 x 2 pine furring strips
- Shiplap panel kit, white
- Brass trim band, adhesive
- High-heat paint, white
11. Beadboard Back Panels That Replace Plain Cabinet Backs

Material note: Cut a 4 x 8-foot beadboard panel to fit (about $30 to $55) and attach with construction adhesive. Prime and paint with two coats. The beginner mistake is skipping a test fit, so cut a cardboard template first.
Color note: Sage green behind white dishes feels fresh and soft.
Budget swap: Use beadboard wallpaper for about $25.
💡 Quick Win: Paint the panel before installing it to avoid taping around edges.
Shop The Look
- Beadboard panel, 4 x 8 ft
- Construction adhesive tube
- Cabinet paint in sage green
- Paint sprayer, small handheld
- Cardboard template roll
12. A Pot Filler and Mixer Tap Look for Under $150
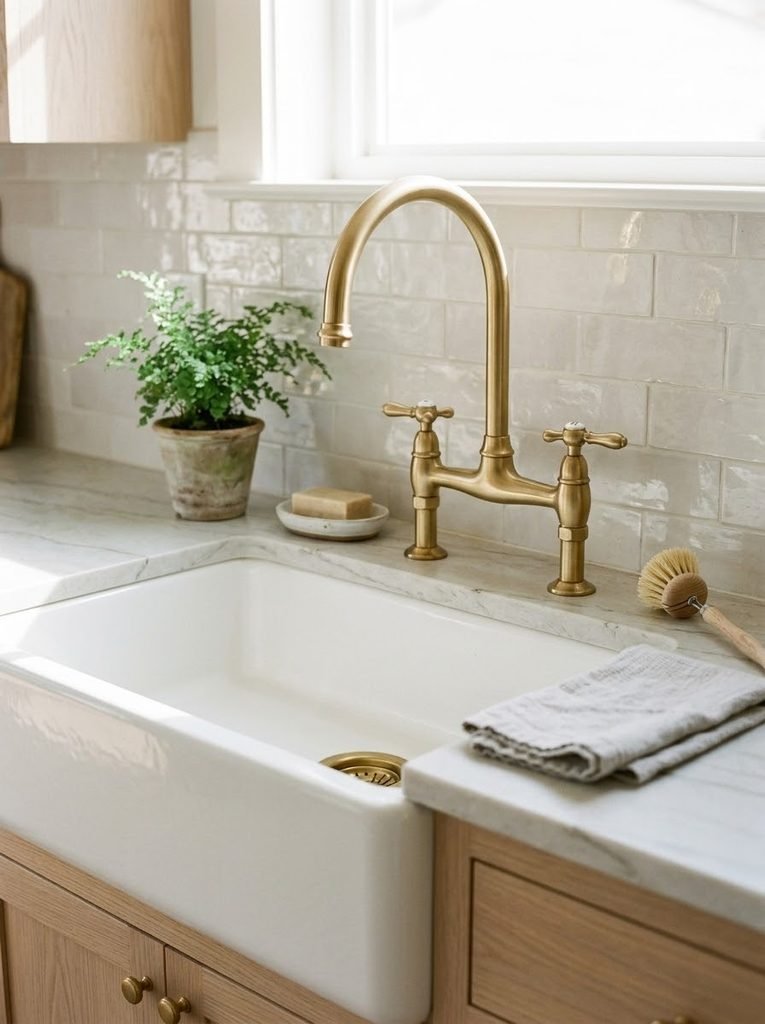
Material note: Choose a brass bridge faucet with a standard 3-hole mount (about $120 to $190). Shut off the water valves, and use a basin wrench. The beginner mistake is forgetting plumber’s tape on the connections, which causes drips.
Color note: Brushed brass against white feels warm and bright.
Budget swap: Use a $60 single-handle faucet in brushed gold.
Shop The Look
- Brass bridge kitchen faucet with cross handles
- Basin wrench tool
- Plumber’s tape, PTFE
- Silicone sealant, clear
- Ceramic soap dish
13. A Picture-Frame Backsplash Trim Detail

Material note: Use 36 inches of 1 x 2 oak trim, mitered at the corners (about $25 to $45), and install it around a 30 x 24-inch tile panel. Caulk the seam and seal with water-based finish. The beginner mistake is leaving gaps at the corners, so test the miters first.
Color note: Oak trim against white tile adds warmth in a single line.
Budget swap: Use peel-and-stick trim strips in a wood finish for about $15.
💡 Quick Win: Tape the miter line before cutting to prevent splintering.
Shop The Look
- 1 x 2 oak trim, 8-foot length
- White subway tile box
- Tile adhesive, premixed
- Water-based polyurethane, satin
- Miter cutting guide
14. A Statement Pendant That Finishes the Look
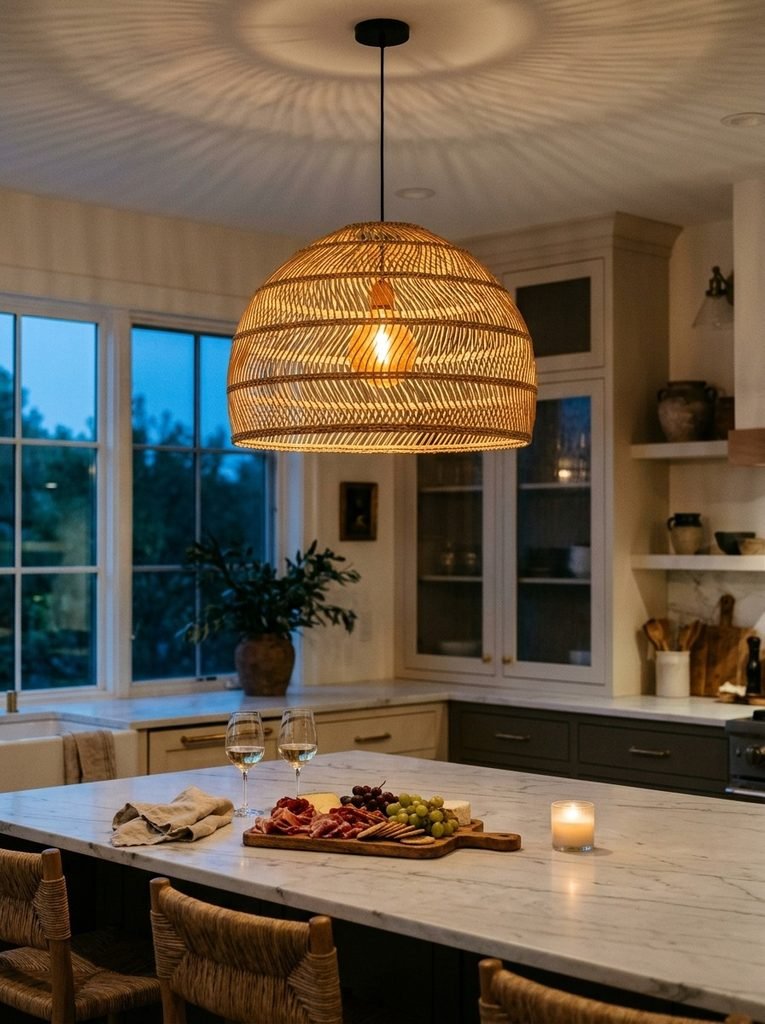
Material note: Hang a 20-inch woven pendant 30 to 36 inches above the island using a plug-in cord kit (about $40 to $90) and a 2700K, 800-lumen bulb. The beginner mistake is hanging it too high, which wastes light.
Color note: Natural rattan softens black or white cabinets with warm glow.
Budget swap: Use a $25 paper lantern with a ceiling hook.
Shop The Look
- 20-inch woven rattan pendant lamp
- Plug-in pendant cord kit, 15-foot
- 2700K dimmable LED bulb, 800 lumens
- Ceiling hook with cord clip
- Inline cord dimmer switch
How to Start Your Custom-Looking Kitchen Project
Start with the hardware and one door front. Swap the pulls on a single drawer run and paint one test door in your chosen color, so you see how it looks in your light before you commit. That small test anchors every bigger decision.
The most common mistake is rushing the prep. Paint and adhesive fail on greasy or unsanded surfaces, so degrease, sand lightly, and prime every piece before finishing.
For budget entry points under $50, begin with a 10-pack of brushed brass pulls, a quart of cabinet enamel, and a set of flexible caulk and a caulk gun. Each one gives an instant, visible upgrade.
Set realistic expectations: hardware, pendants, and caulk take an afternoon, while fronts, trim, and butcher block take several weekends. A starter setup costs $100 to $300, and the full 14-hack kitchen lands between $3,000 and $7,000.
Frequently Asked Questions About IKEA Kitchen Hacks for Creating a Custom-Looking Kitchen on a Budget
What is the difference between a custom and semi-custom kitchen?
A custom kitchen is built to your exact measurements by a cabinetmaker, while a semi-custom one uses factory boxes in set sizes with options for fronts and finishes. Custom costs $30,000 or more, and semi-custom is about half that. An IKEA-based hack looks custom for even less.
What colors work best for a custom-looking kitchen?
Warm white, deep green, natural oak, and greige are the most reliable. Pick one main cabinet color and one accent, such as brass hardware or oak trim, and repeat each at least twice. Test samples on a door in daylight and at night.
How much does it cost to make an IKEA kitchen look custom?
A starter upgrade with hardware, paint, and a pendant costs $100 to $300. A mid-level version with new fronts, trim, and a plinth runs $1,500 to $3,500. Adding butcher block, a waterfall edge, and a range hood wrap brings it to $5,000 or more.
Are these hacks suitable for renters?
Only some of them. Hardware swaps, plug-in pendants, and peel-and-stick tiles can be reversed, but trim, new fronts, and butcher block are permanent. Always check your lease and keep the original hardware in a labeled bag.
What is the most important detail for a custom look?
Door fronts and trim give the biggest impact. Cabinets that reach the ceiling with crown molding, matching toe-kicks, and consistent hardware read as bespoke. Getting the gaps tight and the caulk clean matters more than any single product.
Ready to Create Your Custom-Looking Kitchen on a Budget?
You now have 14 ways to build a custom-looking kitchen on a budget, from painted shaker fronts and crown molding to fluted panels, brass pulls, a wrapped range hood, and a statement pendant. Starting small is the right approach, because one finished detail makes the next one easier to see. Today, swap the pulls on a single drawer and paint one test door to see how the color looks in your light. When you run your hand over those brass handles tomorrow, the kitchen will feel like it was built just for you. Save your favorites to Pinterest, especially the forest green shaker fronts and the rattan pendant at dusk, so you can come back when you are ready to build.